Sunday, 11 November 2012

BINGO! 95 years young

Hello again! 

 My most recent cake was for my boyfriend's grandma's 95th birthday. I had asked what some of her favourite things were and was told she had always loved to play Bingo. So with that, I made a Bingo card cake with Bingo ball cupcakes!

She told me a story during her birthday party saying how she won the final blackout bingo on a cruise a few years before and won $800! That's incredible! 


 I used my strawberry icing for the cupcakes and cake. The cake and cupcakes were french vanilla and the fondant was my marshmallow fondant. The Bingo balls for the cupcakes were white chocolate Lindt balls with numbers piped on them.


Anyways, here are some picture of the cake :)


The finished cake


The set up!

Tuesday, 16 October 2012

Minnie Mouse

This past weekend was my niece's 2nd birthday. She loves Minnie Mouse, or as she likes to call her, "MeMo"! So it only makes sense that her birthday was Minnie Mouse themed!
Her cake and cupcakes were cherry chip with a vanilla frosting dyed pink. The ears for the cupcakes were made with fondant cut out with a melon baller (my circle cutters were either too big or too small so I had to get creative!) and the bows were made with a fondant/gumpaste blend to make them more solid. They were pretty tedious but so worth it.

I bought a half sphere cake pan for the Minnie Mouse hat part of the cake and that cake pan is seriously awesome! It is going to come in handy for so many cakes! 
Here are a few pictures of the process:


Yay cupcakes!


24 hand made bows... tiny but awesome haha!


Finished cupcake!


It's like an army of Minnies!


Super awesome round cake! So happy with the way it turned out and SUPER easy to cover with fondant!


Completed cake and cupcakes! 


Sunday, 30 September 2012

Meg's Birthday Cake

This most recent cake was made for my beautiful big sister :) She loves paris so I tried to tie in a bit of a Parisian feel to it. It's a devil's food cake with chocolate fudge icing which I whipped to get a better consistency. The bottom layer is a cushion with an old fashioned hat box on top with a bow and a 'price tag' that says 'happy 27'.

Sunday, 23 September 2012

A&A's Wedding Cake and Cupcakes

Hello again! 

 This cake was created for a dear friend of mine as her and her husband's wedding present. Their wedding took place at Swan E Set golf course in Pitt Meadows which is an absolutely gorgeous location. It was an incredible August day with clear blue skies and it was hot hot hot! I was making the cake and cupcakes during a heatwave which was NOT enjoyable with an oven going full blast. The fan did next to nothing to keep my kitchen cool! But alas, the cake was made! 

Since my girlfriend has some dietary restrictions, I made the cupcakes and cake with the gluten and wheat free cake mix which I have used for previous cupcakes posted on March 6th. The cake mix is excellent and can be ordered bulk from Well.ca which is an excellent health food and product website. The cake mix itself is called Pamela's gluten free vanilla cake mix. It can be found on their site http://pamelasproducts.com. 

Back to the baking; I quickly realized how little room I had in my freezer when I needed to store the cupcakes! 100 large and 150 mini cupcakes in total... Lots of frozen pasta sauces and buns were thrown out that day. I got creative with the stacking using shot glasses between cake pans as makeshift shelves and even stacked change when I ran out of shot glasses! I'll post a picture of it. One day I will get a deep freeze! 

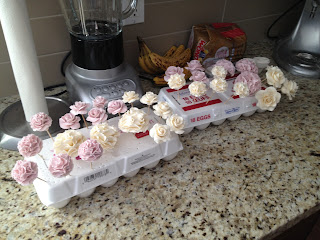
Anyways, here are some picture of the cake making process starting with the flowers.


Mini rose


Bases of some roses, beginnings of the large ivory carnations and finished mauve flowers


Large mauve roses


Small mauve carnation


Finished flowers :)


Starting to pack up the cupcakes before the icing. I wanted the icing to be fresh so I made the cupcakes the day before the wedding and iced them that morning.


Creative stacking complete with shot glasses, loose change, baking sheets and cooling racks!


Beginning to dirty ice the cakes


Hand rolled, individually mother of pearl dusted pearl border 


Finished cake!


Cake set up at Swan E Set


Cupcakes ready to be eaten after the cake cutting :D


Just because it was gorgeous: The view from the terrace just off the Ballroom!


Tuesday, 28 August 2012

Mortgage Burning Cake

My manager at the hospital and I were talking about cakes and she asked if I would make a cake for her mortgage burning party that she was having in a few weeks. We talked about what she wanted and came up with a general idea of a two tiered cake with a house on top with a sign that says "mortgage" that would be on fire. 
I made the house out of Rice Krispie squares, dirty iced it and covered it in fondant. The cake itself was like the engagement party cake I did a while ago which was a lemon cake with a raspberry compote filling and cream cheese icing. My marshmallow fondant was used and coloured by hand (holy, I now have killer forearms from colouring that cake!) Total hours: 8. 
This is what I ended up creating.


Rice Kripie house :) Had to get shaved down a little on the sides because it wouldn't fit on the top tier! Oops haha!


:)

Engagement Party Cake II

Engagement party cake for my cousin. His fiancé requested hot pink and black.


Cake Course Fun!

Well hello!

It has been an eventful Summer! I've been to Vegas, Oroville, the Sunshine Coast, Penticton, and a bit of everywhere else! All while working full time at the hospital and making cakes on the side! Now I'm back at school and good ol' waitressing (aka back to the grindstone after a tease of a glimpse of my future after school is done)...

ANYWAYS! At the beginning of summer I was taking one of the Wilton cake courses from a cake store in Abbotsford. It was seriously SOOO much fun! It was the fondant and gumpaste course. I use my own marshmallow fondant instead of the Wilton of Satin Ice fondants used by that store which has a bit of a different consistency but I will need some serious guts one day to try to make my own gum paste... Until then I've been using Satin Ice gumpaste which is awesome and colours really well. Here's some pictures of the flowers I made in the course as well as my final project for the class :)


Rose bud


Carnation


Calla Lily 


Mum


Daisy


Transporting this cake was interesting haha! I was slightly terrified!


Monday, 2 April 2012

Engagement Party Cake

I have successfully finished my cake! Here's a quick rundown:

First off I started with my cakes which I made the night before my client picked it up. This way they would be cooled so the icing and fondant would not melt while preparing it but the cakes would still be fresh.

I made two 8 inch lemon cakes with fresh raspberries added. When the cake bakes, they call to the bottom to form a nice fresh layer in the middle. I did the same with two 6 inch cakes. I took a bread knife and cut the rounded tops off to create a smooth surface for the fondant.

The night before I also reduced raspberries with sugar to create a compote/jam filling and stuck it in the fridge overnight so it would be cool enough to spread on the cakes. I sandwiched them between the layers.


Next, I dirty iced the cake with a cream cheese icing to control the crumbs and create a smoother surface for the fondant (totally forgot to take a picture of this step, but I'm sure you get the idea.) I rolled out the marshmallow fondant (which by the way worked really nicely with the fresh lemon juice added!) The lemon juice took away the edge from the sweetness of the marshmallows creating a more mellow flavour. 


And of course I repeated the same with the other layer. Transferring the top layer was not the most fun in the world but with the use of two spatulas, it did the trick haha! I created a band with the fondant and dusted it with silver lustre dust for a light sheen. (Kind of hard to tell in this lighting. Rainy weather doesn't create the most beautiful natural light)...


And then... FLOWERS!


And there you have it. The finished engagement party cake :)


Wednesday, 28 March 2012

Gumpaste Flowers!

So today I almost finished my flowers! I just need to buy white stamens to finish the white flowers. I remembered black but there's always at least one thing that I forget somehow haha! 


I've used the trick of shot glasses before since I only have 3 small and 3 large flower formers and the wavy flower former does not shape flowers correctly. Leaves, yes but flowers, no. 


Anyways, flip the shot glass upside down and put the flower upside down on it as well like in the second picture. This will help the flower dry rounded and open. Once they're dried slightly, you can flip the shot glass and flower right side up and nestle the flower in the opening. If you put the flower in the shot glass before it has started drying, it will sink right into the shot glass and close up.


I made the marshmallow fondant as well! It worked great and tastes quite good although incredibly sweet. (Makes sense as it's marshmallows and sugar). I think I'm going to add a bit of lemon juice though since I'm a little afraid of it being too different a flavour compared to the lemon raspberry cake underneath. I'll use fresh squeezed lemon juice and strain the heck out of it!!! I don't think it would affect the white colour of the fondant at all... I just need enough lemon juice to tie the flavours together. Fingers crossed!

Friday, 23 March 2012

Okay, I'm back!

Nothing like papers and exams to take people away from fun haha! Well, I am back and will try posting more often!

Currently I am working on a cake for an engagement party which I need to finish in just over a week so I've decided to start now on the gum paste flowers and fondant so I can perfect those first. Since I'm still pretty new at the whole gum paste flower stuff I have been experimenting with my tools. I've used flower cutouts before and been able to form them with the rounded tool but I recently discovered the awesomeness of the veining tool! It gives the flower that little bit extra that it was needing before.


The colours for the cake are black and white and grey/silver so I'm going to have black on white and white on black flowers but I'm still trying to figure out how to do the middle. Should I have a stamen-type look? Just a ball for the center? Or should I form it into a smaller version of the white part? See, this is why I am starting early!

I'm also experimenting with marshmallow fondant. I've made tr traditional ones before and yeah it works to cover a cake but it definitely does NOT taste good! Since it is my first cake for a client, I want it to be yummy. I've heard so many good reviews about marshmallow fondant I thought, why not! And if I fail miserably, I'll always just go to my local cake store and buy some SatinIce! Heck yes!


P.S. if you're ever trying to make black gum paste, I would invest in a pair of disposable gloves haha... I learned the hard way and had purple hands after!! Oh, and it requires a LOT of icing colour, so scoop it out, don't do the toothpick method where you slather tiny bits of coloring on at once. If you want it a bold colour, use plenty!

 P.P.S. if you ever need stress relief, yoga is the way to go ;)

Tuesday, 6 March 2012

Gluten and wheat free mini vanilla cupcakes with fresh strawberry butter icing

Cupcake mix found at save-on or local grocery store in the natural food section. Don't remember this exact brand but it was DELICIOUS! So light and fluffy! 

I added an extra (generous, haha) tbsp of strawberry puree to the icing to give it less of a sugar flavour. It ended up tasting so delicious. Make sure you mix it for longer to make it more fluffy! The icing recipe is from the following site:
http://www.marthastewart.com/316838/sprinkles-strawberry-frosting
Cooking and baking are my passions... my escape. I have been exposed to amazing skills since a young age; my mom is my kitchen inspiration. I was her sous chef growing up where she taught me all my basics - preparing veggies, peeling roasted garlic, never settling for shaker parmesan. I blame her for my high expectations for myself as every single thing she made was fantastic! Before I moved out, I could not leave until I had some of my favourite recipes of hers like roast beef, tomato and onion salad and numerous other (I actually made both of those tonight!) 

I started baking within the past couple years and have dabbled in cake decorating. I got a ton of inspiration from many cake-boss marathons. One night after a particularly inspiring episode, I spent probably close to 8 hours making fondant and baked a lemon cake with cream cheese frosting. I draped it with fondant and created a bow along the base (I'll find the picture and post it later). It was so fun that I didn't even realize how long it had been. Another time I made chocolate cupcakes and covered them with pink fondant and piped little flowers on top. I had no idea what I was doing but I was experimenting and having fun and that's all that mattered to me! I made my mom's birthday cakes two years in a row. I'll post pictures for the first one later. I'm pretty happy with the way her cake this year turned out! It was my first stab at a multi tiered cake. I had just bought a Wilton class set not realizing that it didn't come with instructions for how to use the tools... It was fun figuring out how to make flowers and messing around with the tools! 

Baking is glorious. Cooking is fantastic. Mess around! Have fun! The more you do it, the easier it gets. Find inspiration whether it be a loved one, a TV show or a magazine article and do not be disappointed if it doesn't turn out perfectly the first time. Tweak it, add your own spin and perfect it in your own way. It makes life more interesting ;) 
Happy Baking and Merry Cooking!